- 1 1. Introduction: Why Use VS Code on Ubuntu?
- 2 2. Comparing Installation Methods: Snap / apt (Microsoft Repository) / Official DEB
- 3 3. Method A: Install via Official DEB → apt Integration (Recommended)
- 4 4. Method B: Install with Snap (GUI / CLI)
- 5 5. Initial Setup: Japanese Language, Fonts, and Display Adjustments
- 6 6. Essential Extensions & Basic Settings (Set Up in the First 10 Minutes)
- 7 7. Quick Language-Specific Environment Setup
- 8 8. Remote Development: Remote SSH / Dev Containers / Codespaces
- 9 9. Common Issues and Solutions
- 10 10. Security and Update Policy
- 11 11. Summary: Building a “Ready-to-Use” Ubuntu × VS Code Environment Quickly
- 12 FAQ (Frequently Asked Questions)
1. Introduction: Why Use VS Code on Ubuntu?
Visual Studio Code (hereafter, VS Code) is a lightweight yet highly functional source code editor. Developed by Microsoft, it combines open-source elements with exceptional extensibility, making it a favorite among developers worldwide. In addition to Windows and macOS, one of its biggest advantages is its stable performance on Linux-based operating systems.
Among them, Ubuntu is one of the most widely used Linux distributions globally. It offers official Long-Term Support (LTS) releases, providing strong stability and security. It’s free to use, comes with a vast package repository, and is backed by an active community, making it popular for everything from personal projects to enterprise use.
The main benefits of using VS Code on Ubuntu include:
- Lightweight and fast performance: Runs smoothly even on low-spec machines or in cloud environments.
- Rich extensions: Easily add language-specific support, Git integration, remote development features, and more.
- Cross-platform consistency: Develop with the same look and feel across different operating systems.
- Official support: Microsoft provides official Ubuntu packages with easy updates.
In this guide, we’ll cover everything from installing VS Code on Ubuntu, enabling Japanese language support, setting up your development environment, to using remote development and containers—step by step. Whether you’re new to Ubuntu or switching from another editor, this article will help you set up a complete VS Code environment in the shortest time possible.
2. Comparing Installation Methods: Snap / apt (Microsoft Repository) / Official DEB
When installing VS Code on Ubuntu, there are three main methods to choose from. We’ll compare their features, pros, and cons so you can select the one that best fits your needs.
2-1. Snap (Software Center or CLI)
Features
- Distributed in the “Snap” format, widely used as Ubuntu’s standard package management method.
- Available for one-click installation via the Ubuntu Software Center.
- From the terminal, run
sudo snap install --classic codeto install.
Advantages
- Easy to get via a graphical interface—ideal for beginners.
- Automatic updates ensure security and quick access to new features.
Disadvantages
- Due to its sandbox architecture, some users report issues with IME input or theme compatibility.
- May have slightly slower startup or response times.
2-2. apt (via Microsoft’s Official Repository)
Features
- Uses the Microsoft-provided APT repository to manage VS Code.
- Requires registering the repository using a
.debfile during the first install, after which updates are handled with the usualsudo apt update && sudo apt install code.
Advantages
- Integrates with standard APT management for smooth updates.
- High compatibility with Japanese input and other essential features.
- Clear and simple update control.
Disadvantages
- Requires extra steps for initial repository setup.
- May feel slightly less approachable for users used to GUI-only installations.
Learn how to install Microsoft products on Linux using the p…

Ubuntuでのパッケージ・マネジャーと言えば”apt”だが、そのレポジトリでVSCodeは提供されていない。Ubunt…

2-3. Standalone Installation via Official DEB File
Features
- Download the
.debpackage directly from Microsoft’s official site. - Install with
sudo apt install ./code_*.deb, which automatically resolves dependencies.
Advantages
- Can be installed easily in offline or restricted network environments.
- Good for one-time setups without adding a repository.
Disadvantages
- To receive updates automatically, you’ll need to set up the repository manually afterward.
- Requires more manual maintenance than Snap or repository-based installs.
2-4. Which Should You Choose?
- Ease of use / GUI preference → Snap (via Ubuntu Software Center)
- Stability / Japanese input & extensibility → apt (official repository)
- Quick install only / minimal setup → Official DEB (standalone)
For long-term daily development, apt (official Microsoft repository) offers the best balance with straightforward update management. For quick trials or testing on a fresh environment, Snap is convenient. For offline or restricted environments, Official DEB is ideal.
3. Method A: Install via Official DEB → apt Integration (Recommended)
Here, we’ll use the .deb file installation recommended by Microsoft, while also registering the APT repository so that VS Code stays up to date automatically. This method is highly compatible with Japanese input and avoids IME-related issues sometimes reported with the Snap version.
3-1. Download the DEB File from the Official Site
- In your browser, go to the Visual Studio Code official download page.
- Click the “.deb” (for Debian/Ubuntu) button to download the file.
3-2. Install from the Terminal
If the downloaded file is in ~/Downloads, run:
cd ~/Downloads
sudo apt install ./code_*.deb- Passing the
.debfile directly toapt installautomatically resolves dependencies. - This process will also register Microsoft’s APT repository.
3-3. Verify the Installation
Check the version with:
code --versionOr search for “Visual Studio Code” in your applications menu and launch it.
3-4. How to Update
Since the APT repository is registered, VS Code will be updated along with your regular system updates:
sudo apt update
sudo apt upgrade
3-5. Uninstalling (Reference)
To remove VS Code:
sudo apt remove code
sudo apt autoremove
With this setup, you can keep VS Code up to date effortlessly after the initial configuration.
4. Method B: Install with Snap (GUI / CLI)
Snap is Ubuntu’s standard package format, allowing quick installation from the Software Center (GUI) or the command line. It’s especially convenient for beginners or those who want a no-setup install.
4-1. Install via Software Center (GUI)
- Open the Ubuntu Software app from the “Applications” menu.
- Type “Visual Studio Code” or “code” in the search bar.
- Select “Visual Studio Code” from the results and click “Install.”
- Enter your password to complete installation.
4-2. Install from the Command Line (CLI)
Open a terminal and run:
sudo snap install --classic code- The
--classicflag grants the Snap package normal filesystem access. - Download and installation complete in a few minutes.
4-3. Verify Installation
code --versionOr launch “Visual Studio Code” from the applications menu.
4-4. Updating and Removing
- Snap packages update automatically; manual updates are generally not needed.
- To remove VS Code:
sudo snap remove code4-5. Notes on the Snap Version
- Japanese input: Some environments may have IME issues in the Snap version. Switching to the DEB → apt method often resolves this.
- Startup speed: Due to Snap’s sandboxing, the first startup can be slightly slower.
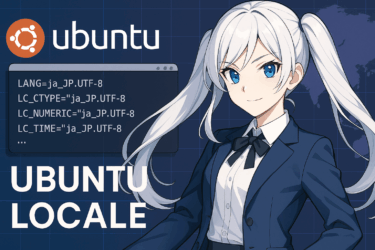
5. Initial Setup: Japanese Language, Fonts, and Display Adjustments
After installing VS Code on Ubuntu, it’s a good idea to set up Japanese language support and a comfortable display environment. Doing this early makes development smoother.
5-1. Enable Japanese (Install Japanese Language Pack)
- Open VS Code and click the Extensions icon on the left (four squares icon).
- Type Japanese Language Pack in the search bar.
- Install the “Japanese Language Pack for Visual Studio Code” extension.
- When prompted in the bottom-right corner, click [Change Language].
- Restart VS Code to apply Japanese UI.
Manual change: Press Ctrl+Shift+P (or F1), type Configure Display Language, and select ja.
5-2. Font Settings
For programming, a clear monospace font that distinguishes between full-width and half-width characters is recommended.
- Go to [File] → [Preferences] → [Settings].
- Search for “font family.”
- Set your preferred font (e.g.,
Cascadia Code,Fira Code,Noto Sans Mono CJK JP).
Using ligature-supported fonts makes symbols like => or === visually easier to read.
5-3. Display Adjustments (Theme and Icons)
- Change theme: Press
Ctrl+K, thenCtrl+Tto open the theme selector and choose your preferred color scheme. - Change icon theme: Press
Ctrl+Shift+P, typeFile Icon Theme, and pick an icon set to make file types easier to identify.
5-4. Recommended Additional Settings
- Show line numbers: Set
editor.lineNumberstoon. - Format on save: Enable
editor.formatOnSave. - Auto-save: Set
files.autoSavetoafterDelay.
With these basics in place, your workspace is ready. In the next section, we’ll look at essential extensions and configuration examples to boost productivity.
6. Essential Extensions & Basic Settings (Set Up in the First 10 Minutes)
One of VS Code’s biggest advantages is how easily it can be customized through extensions. Here are the must-have extensions and the basic settings you should configure right after installation to greatly improve development efficiency in Ubuntu.
6-1. Must-Have Extensions
- Japanese Language Pack for Visual Studio Code
- Required for Japanese UI display. Already covered in the previous section.
- Python
- Essential for Python development. Adds linting, IntelliSense, debugging, and more.
- Combine with the
Jupyterextension to work with notebooks.
- C/C++
- Provides IntelliSense, debugging, and syntax highlighting for C and C++.
- Use alongside the
build-essentialpackage for full functionality.
- GitLens
- Visualizes Git history and changes—extremely useful for team development.
- Remote Development Pack
- Enables development over SSH, in Docker containers, or within WSL.
- Prettier – Code Formatter
- Automatically formats code. Supports JavaScript, TypeScript, HTML, CSS, and more.
6-2. Key Settings to Configure First
- Format on Save
"editor.formatOnSave": true→ Automatically formats code when you save, ensuring consistent style.
- Tab Width and Indentation
"editor.tabSize": 4,
"editor.insertSpaces": true
→ Match your team’s coding standards.
- Insert Final Newline
"files.insertFinalNewline": true- Show Line Numbers
"editor.lineNumbers": "on"- Trim Trailing Whitespace
"files.trimTrailingWhitespace": true6-3. Enable Settings Sync
Sign in with your Microsoft or GitHub account and turn on Settings Sync. This keeps your settings and extensions in sync across multiple devices or after reinstallation.
At this point, you’ll have all the essential features ready for development.
7. Quick Language-Specific Environment Setup
Here’s how to quickly set up environments for two of the most in-demand languages on Ubuntu—Python and C/C++. With these configurations, you can start developing right away.
7-1. Python Environment Setup
- Install Python and Virtual Environment Tools
sudo apt update
sudo apt install python3 python3-venv python3-pippython3-venvlets you isolate dependencies per project.pipis the Python package manager.
- Install VS Code Extensions
- Install the official “Python” extension.
- Add the “Jupyter” extension if you want notebook-style development.
- Create and Activate a Virtual Environment
python3 -m venv .venv
source .venv/bin/activate
VS Code detects the environment automatically when the Python extension is active.
- Set Up Linting/Formatting (Example: ruff + black)
pip install ruff blackConfigure VS Code to run black for formatting and ruff for linting on save.
7-2. C/C++ Environment Setup
- Install Compiler and Required Packages
sudo apt update
sudo apt install build-essential gdb- Includes
gcc,g++, and thegdbdebugger.
- Install VS Code Extensions
- Install the official “C/C++” extension.
- Optionally, install “CMake Tools.”
- Set Build Tasks
- Open the Command Palette (
Ctrl+Shift+P) → “Tasks: Configure Default Build Task” → chooseg++ build active file. - Press
Ctrl+Shift+Bto build the current file.
- Add Debug Configurations
- Press
F5→ Select “C++ (GDB/LLDB).” - VS Code creates
.vscode/launch.jsonfor debugging with breakpoints, variable watch, etc.
7-3. Test the Setup
Python Example:
print("Hello, Python on Ubuntu!")C++ Example:
#include <iostream>
using namespace std;

int main() {
    cout << "Hello, C++ on Ubuntu!" << endl;
    return 0;
}
Build the C++ code with Ctrl+Shift+B and run the output file.
8. Remote Development: Remote SSH / Dev Containers / Codespaces
VS Code supports not only local development but also remote servers and container-based environments, giving you flexibility and reproducibility.
8-1. Remote SSH
Overview
Work directly on remote servers through your local VS Code. It launches a VS Code server on the remote machine, letting you edit and run code as if it were local.
Steps
- Install the Remote Development Pack extension (includes “Remote – SSH”).
- Add your host info to
~/.ssh/config:
Host myserver
    HostName 192.168.0.50
    User ubuntu
IdentityFile ~/.ssh/id_rsa- Press
Ctrl+Shift+P→ “Remote-SSH: Connect to Host” → selectmyserver.
Advantages:
- Edit, run, and debug without manually logging into the server.
- Keep your local machine clean while developing in the server environment.
8-2. Dev Containers
Overview
Use Docker containers as full-featured development environments. Settings are stored in a .devcontainer folder so anyone can reproduce the same setup.
Steps
- Install Docker and Docker Compose on Ubuntu.
- Install the “Dev Containers” extension in VS Code.
- Create
.devcontainer/devcontainer.jsonin your project root, for example:
{
    "name": "Python Dev",
    "image": "python:3.11",
    "features": {},
    "settings": {
        "terminal.integrated.shell.linux": "/bin/bash"
    }
}- Press
Ctrl+Shift+P→ “Dev Containers: Reopen in Container.”
8-3. GitHub Codespaces
Overview
Run VS Code in the cloud via GitHub, accessible from a browser—no local setup required.
Steps
- Go to your GitHub repo → “Code” → “Codespaces” → “New codespace.”
- Within seconds, a development environment launches in your browser.
- You can also connect from your local VS Code if needed.
Advantages:
- Develop from low-spec devices or even mobile.
- Access the same environment anywhere with an internet connection.
9. Common Issues and Solutions
When using VS Code on Ubuntu, certain issues can arise depending on your environment or installation method. Below are the most common problems and how to resolve them.
9-1. Cannot Type in Japanese / Unstable IME Conversion
Cause
- In the Snap version, IME (Japanese Input Method) compatibility issues can occur.
- Some input methods may not function properly in the sandboxed environment.
Solution
- Uninstall the Snap version and reinstall using the Official DEB (APT-linked) method.
- Reconfigure
fcitxoribusif necessary.
9-2. Slow Startup / Laggy Performance
Cause
- Snap sandbox initialization or heavy extension loading.
- Too many unnecessary extensions enabled.
Solution
- Start with extensions disabled using
code --disable-extensionsto identify problematic ones. - Switch from the Snap version to the DEB version if necessary.
9-3. Certain Extensions Not Working
Cause
- Missing library dependencies in Ubuntu.
- Permission issues in container or remote environments.
Solution
- Install required packages via
sudo apt install. - Check permissions for any paths used by the extension.
9-4. Display/Input Problems on Wayland
Cause
- VS Code often runs through XWayland, and native Wayland support is not yet complete.
Solution
- Switch your login session to Xorg.
- Or launch VS Code with:
code --ozone-platform=x119-5. Fully Uninstalling
Solution
- DEB version:
sudo apt remove code
sudo apt autoremove
rm -rf ~/.config/Code- Snap version:
sudo snap remove code
rm -rf ~/.config/Code
10. Security and Update Policy
If you plan to use VS Code long-term on Ubuntu, security and keeping it up-to-date are essential. Here’s how each installation method handles updates, and what to keep in mind for security.
10-1. Update Behavior by Installation Method
- APT (Official Repository)
- Updates are applied with
sudo apt update && sudo apt upgradealongside the system. - Includes both security patches and new features—balanced for stability and freshness.
- Snap Version
- Snapd automatically updates the package; user action is usually not required.
- Updates may not apply instantly due to Snapd’s schedule.
- Standalone DEB (No Repository)
- No automatic updates—download manually from the official site when needed.
10-2. Security Precautions
- Always use trusted sources: Download only from the official site or Microsoft’s official repository.
- Avoid unofficial PPAs or third-party packages to prevent tampering or malware risk.
- Check extensions: Verify the publisher and reviews; avoid outdated or unmaintained ones.
- Permission management: When using Remote SSH or Dev Containers, secure SSH keys and avoid unnecessary root privileges in Docker.
10-3. Suggested Update Frequency
- For stable production use: Follow Ubuntu LTS update cycles; update every few weeks.
- For latest features: Check for updates weekly.
- Snap version: Let it auto-update, but you can roll back if needed (
sudo snap revert code).
11. Summary: Building a “Ready-to-Use” Ubuntu × VS Code Environment Quickly
We’ve covered installation methods, initial setup, language environments, remote development, troubleshooting, and security for VS Code on Ubuntu. Here’s the quickest path to a fully functional development environment:
11-1. Quick Setup Steps
- Install
- For stability and easy updates, choose Official DEB → APT.
- For quick trials, Snap is fine (watch for Japanese input issues).
- Initial Settings
- Install Japanese Language Pack.
- Adjust fonts and themes.
- Enable format-on-save, line numbers, etc.
- Install Essential Extensions
- Python, C/C++, GitLens, Remote Development Pack, Prettier, etc.
- Enable Settings Sync.
- Set Up Language Environments
- Python: Install
python3-venv, configure lint/format tools. - C/C++: Install
build-essential, configure build/debug.
- Configure Remote Development
- Remote SSH, Dev Containers, or Codespaces.
- Maintain Security & Updates
- Use official sources, check extensions, update regularly.
11-2. How to Use This Guide
- If you’re new to Ubuntu, follow the steps in order for a ready-to-use dev environment in under an hour.
- If you’re migrating from another editor, take advantage of VS Code’s extensions and remote development for greater efficiency.
- For quick troubleshooting, check Chapter 9.
FAQ (Frequently Asked Questions)
Q1. Snap or APT—Which Should I Choose?
A. For long-term stability, choose APT (via official DEB). It updates with your system, making it easier to maintain. Snap is fine for quick trials but may have Japanese input or speed issues.
Q2. How Do I Enable Japanese?
A. Install “Japanese Language Pack for Visual Studio Code” from Extensions, then set Configure Display Language to ja and restart VS Code.
Q3. Japanese Input Isn’t Working—What Now?
A. If using Snap, IME compatibility may be the issue. Switch to the DEB version. Also check ibus or fcitx settings.
Q4. How Do I Start Python Development?
A. Install Python and venv: sudo apt install python3 python3-venv python3-pip, then add the “Python” extension. Create a virtual environment and select it in VS Code.
Q5. I Can’t Build C/C++ Code.
A. Install build-essential gdb, enable the “C/C++” extension, and set up tasks.json so you can build with Ctrl+Shift+B.
Q6. How Do I Use Remote SSH?
A. Install “Remote Development Pack,” add host info to ~/.ssh/config, then use “Remote-SSH: Connect to Host” from the Command Palette.
Q7. What Are Dev Containers?
A. They let you run a fully isolated development environment in Docker. Create a .devcontainer/devcontainer.json file to define it.
Q8. How Often Should I Update?
A. For stability, follow LTS cycles and update every few weeks. For latest features, update weekly. Snap updates automatically; APT requires apt upgrade.